Tips and tutorials
Email Service

- NETVIGATOR Email Setup
- Frequently-asked questions
-
 NETVIGATOR EMAIL SETUPHow do I set up an email client on a mobile phone and/or computer?
Simply refer to the following table to configure the incoming and outgoing mail servers, and to manage your NETVIGATOR mailbox via email clients such as Microsoft Outlook or on an intelligent device.
Configuration guideSelect the incoming mail server and email client
- Email Setting
- Android
- iOS
- Windows
- Mac OS
- Outlook
-
Configuration of email account settings
Incoming Mail Server ActiveSync
(Not applicable to Microsoft Exchange Server)Server: em.netvigator.com Domain: netvigator.com or hkstar.com Use SSL: Yes Enter username (not including @netvigator or @hkstar.com) and password IMAP Server Server: imap.netvigator.com Authentication: Yes Use SSL: Yes Port: 993 Enter username (@netvigator.com or @hkstar.com) and password POP Server Server: pop.netvigator.com Authentication: Yes Use SSL: Yes Port: 995 Enter username (@netvigator.com or @hkstar.com) and password Outgoing Mail Server Server: smtp.netvigator.com Authentication: Yes SSL: Yes Port: 465 Enter username (@netvigator.com or @hkstar.com) and password -
NETVIGATOR Email Exchange ActiveSync on Android
-
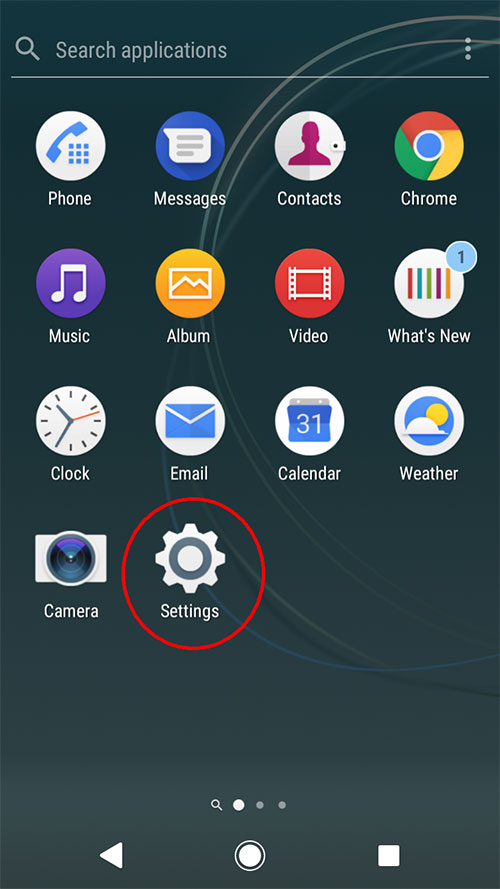
1. Open "Settings"
-
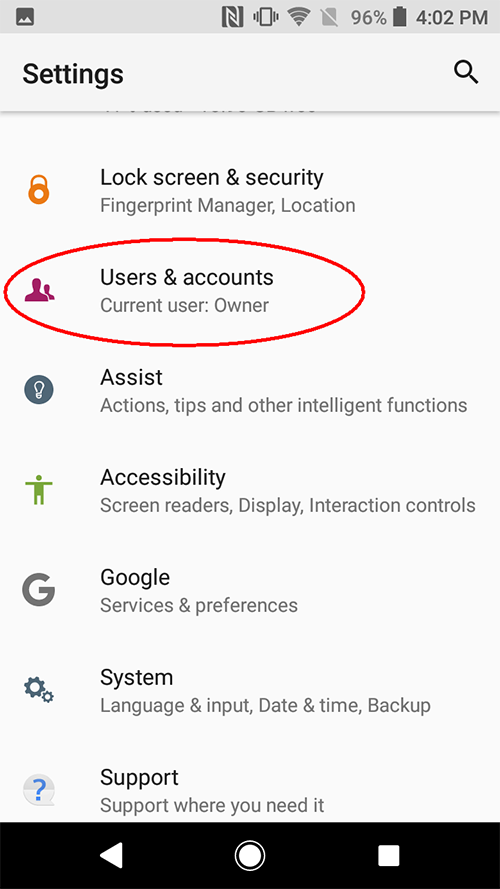
2. Select "Users & accounts"
-
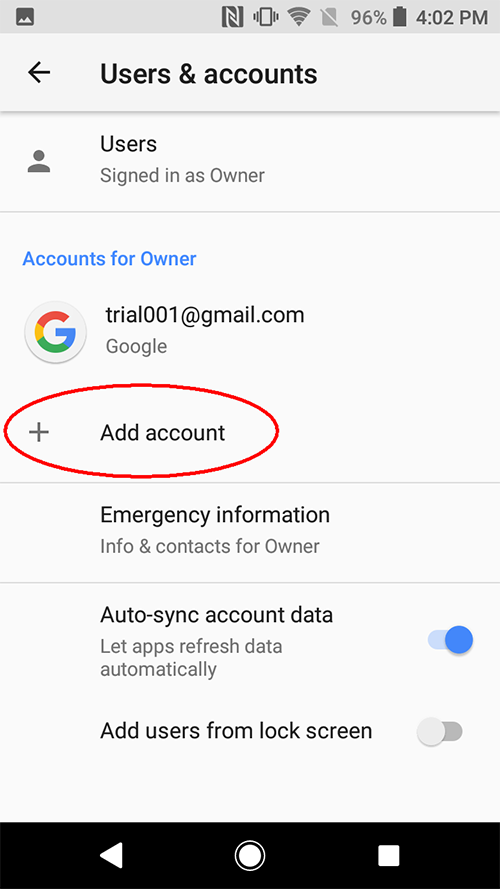
3. Click "Add account"
-
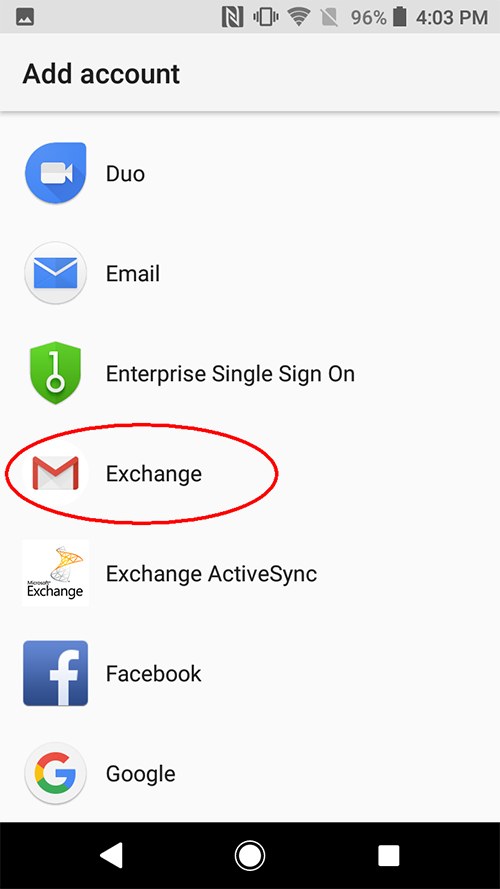
4. Select "Exchange"
-
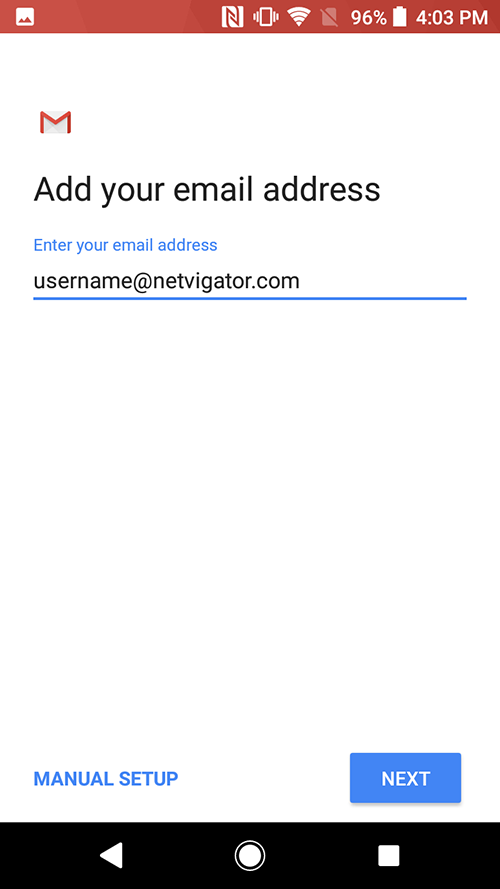
5. Enter you NETVIGATOR email address and click "Next"
-
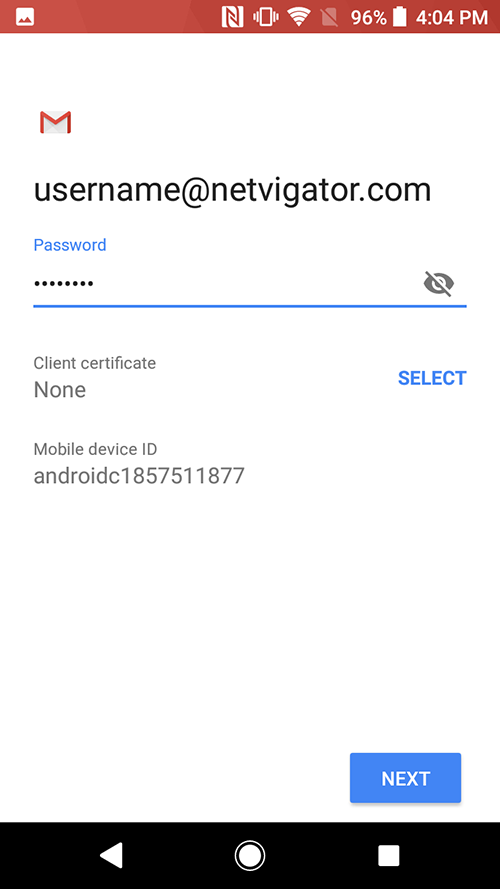
6. Enter you NETVIGATOR password and click "Next"
-
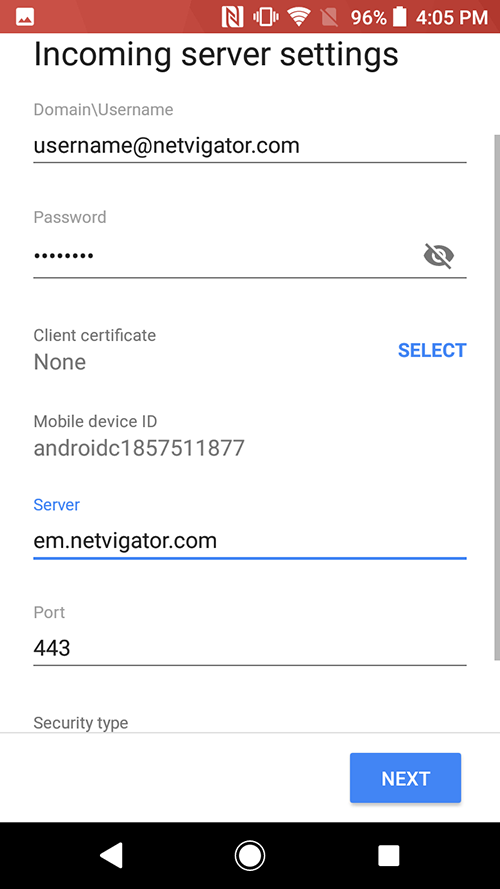
7. Enter the following information and click "Next"
Server: em.netvigator.com -
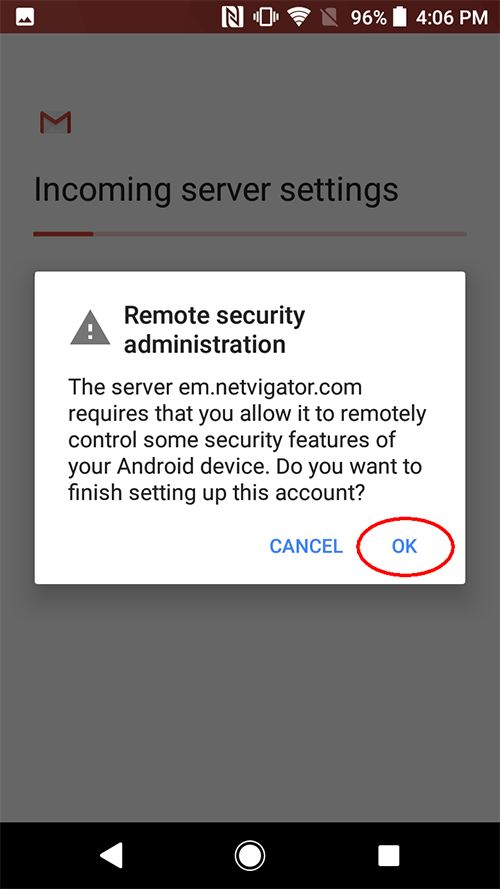
8. Click "OK"
-
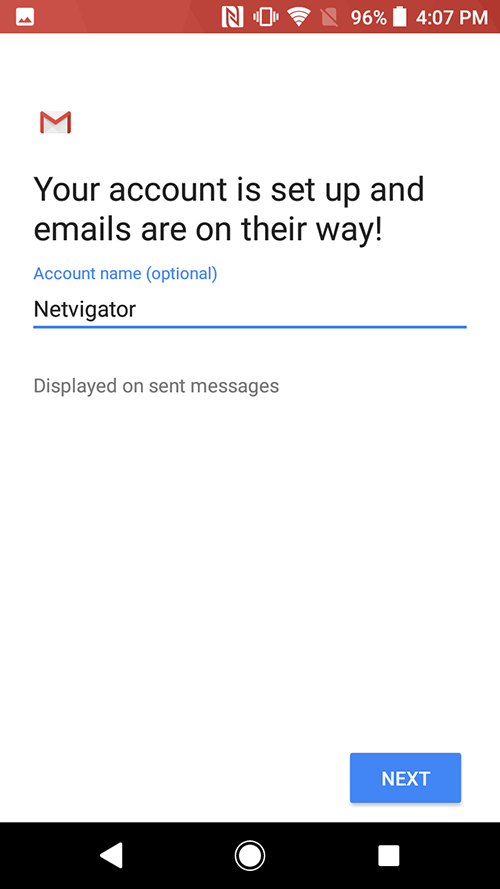
9. You may give this account a name, and click "Next" to finish setup
You can now receive NETVIGATOR push emails on your Android device
-
-
NETVIGATOR Email Exchange ActiveSync on iOS
-
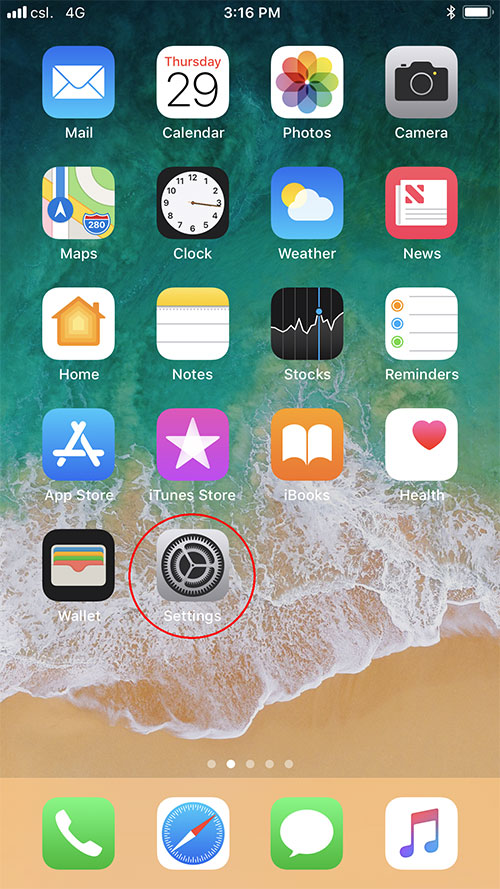
1. Open "Settings"
-
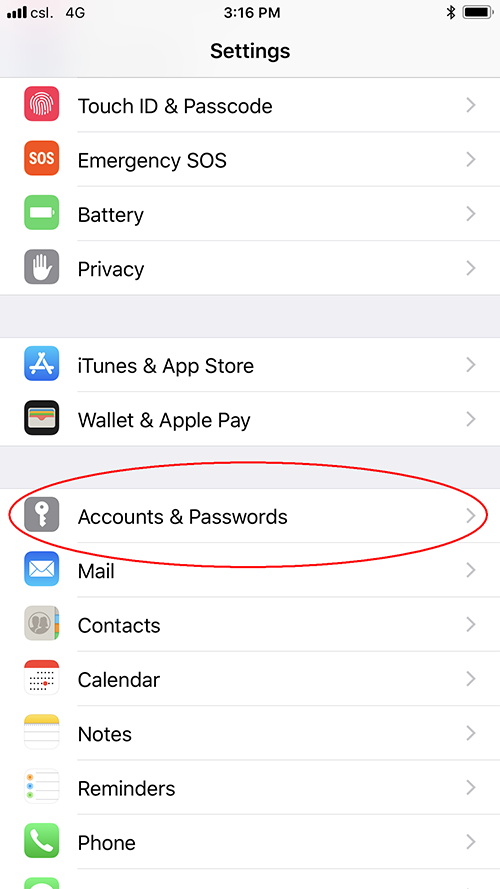
2. Select "Accounts & Passwords"
-
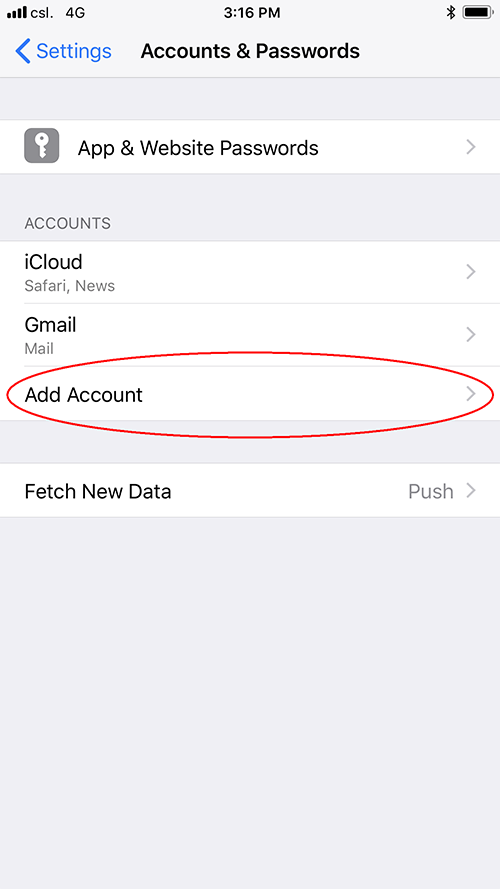
3. Select "Add Account"
-
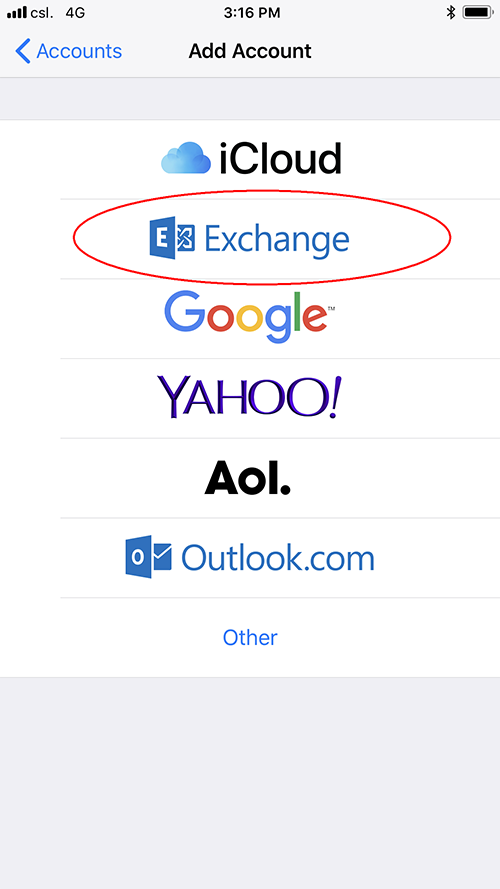
4. Select "Exchange"
-
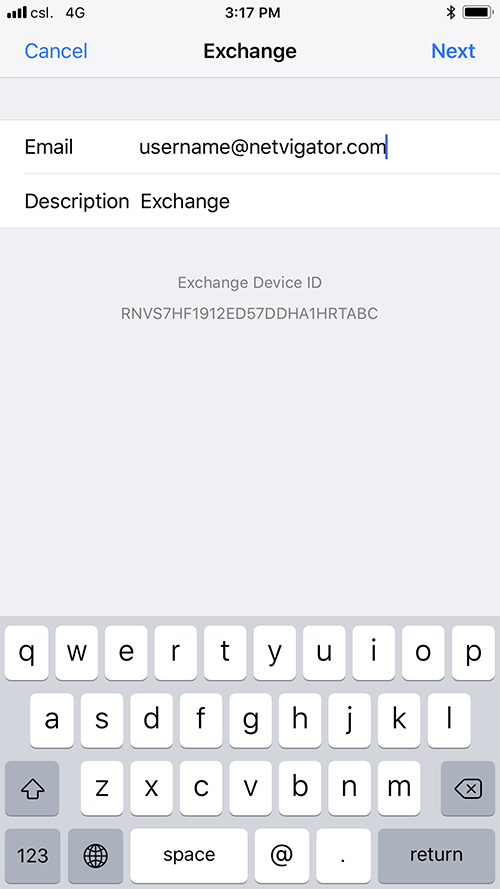
5. Enter you NETVIGATOR email address and click "Next"
-
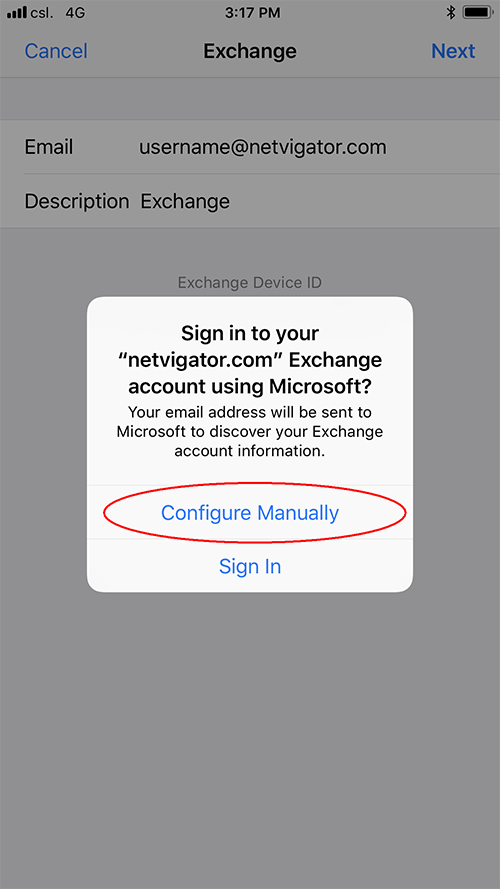
6. Select "Configure Manually"
-

7. Enter you NETVIGATOR password and click "Next"
-
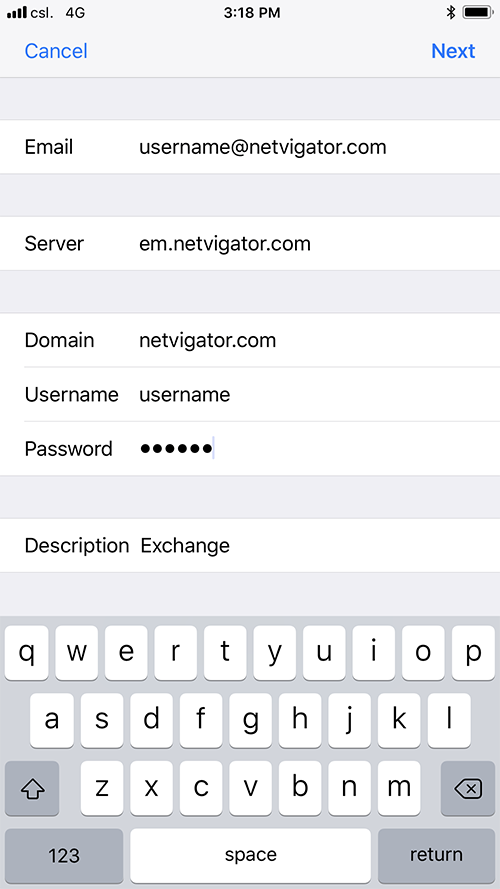
8. Enter the following details:
Server: em.netvigator.com
Domain: netvigator.com
Username: (your NETVIGATOR Login ID, do NOT include "@netvigator.com")
Click "Next"
Note: Use "hkstar.com" for Domain if your email address is username@hkstar.com -
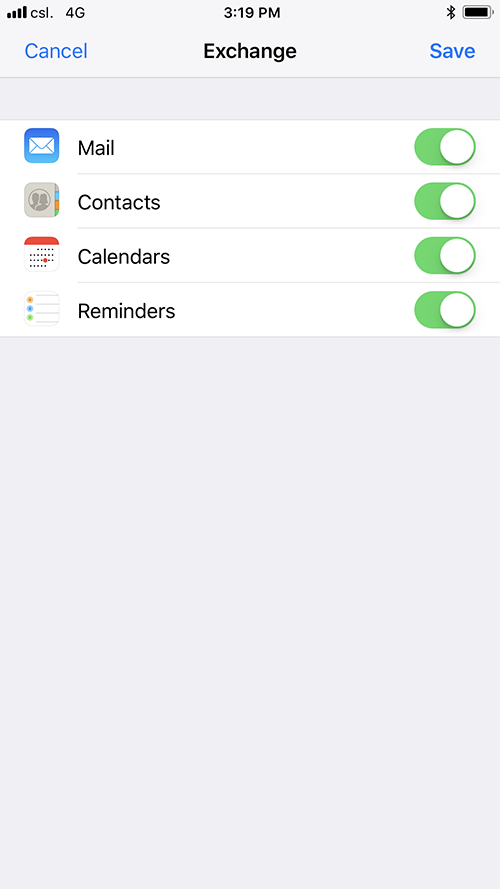
9. Enable sync for all options (refer to figure above), then click "Save" to finish setup
You can now receive NETVIGATOR push email on your iOS device
-
-
NETVIGATOR Email Exchange ActiveSync for Windows 10/11
-
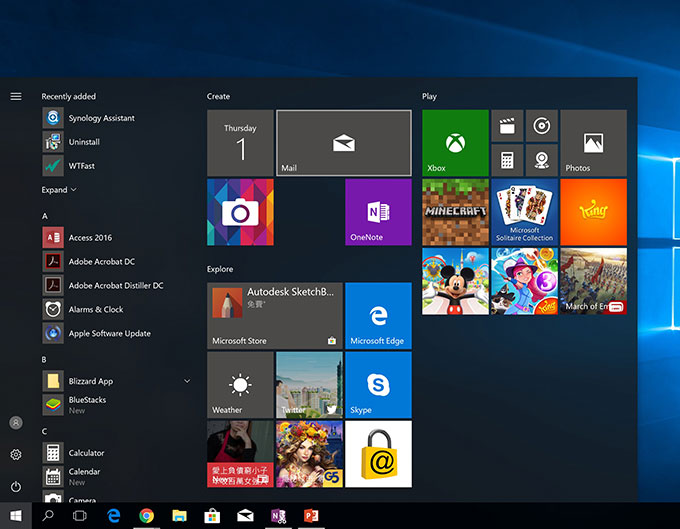
1. Click "Mail" on "Start" screen
-
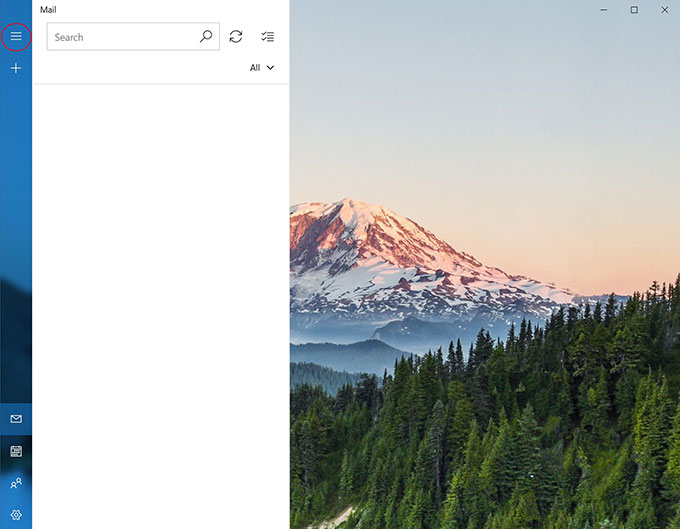
2. Click the icon at upper left-hand corner to open selection menu
-
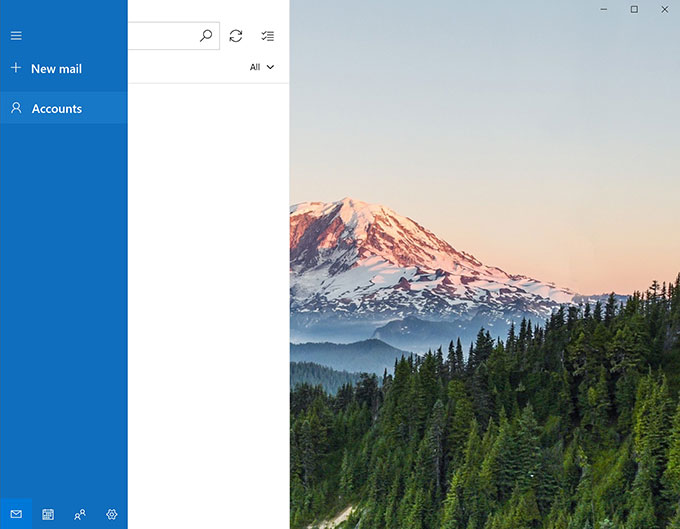
3. Select "Accounts"
-
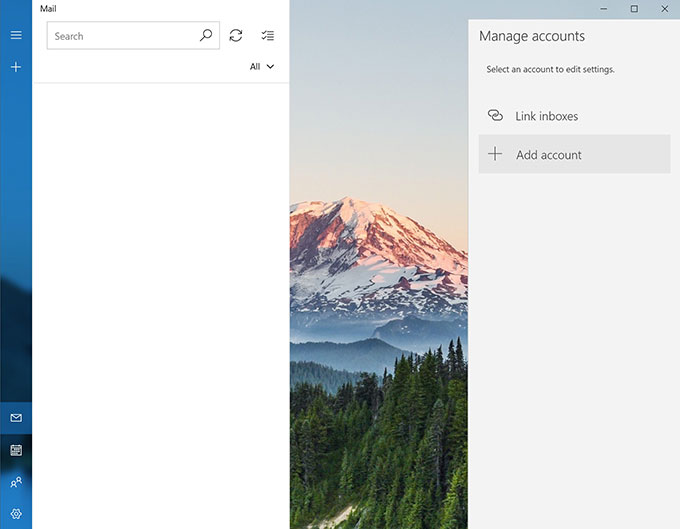
4. Select "Add account"
-
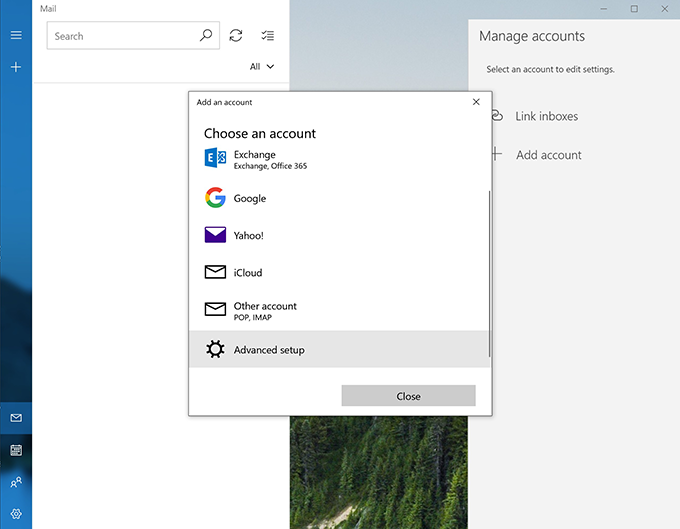
5. Select "Advanced setup"
-
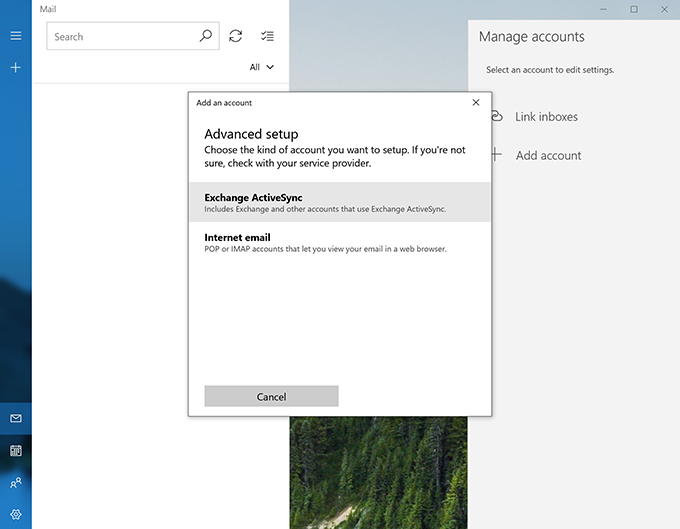
6. Select "Exchange ActiveSync"
-
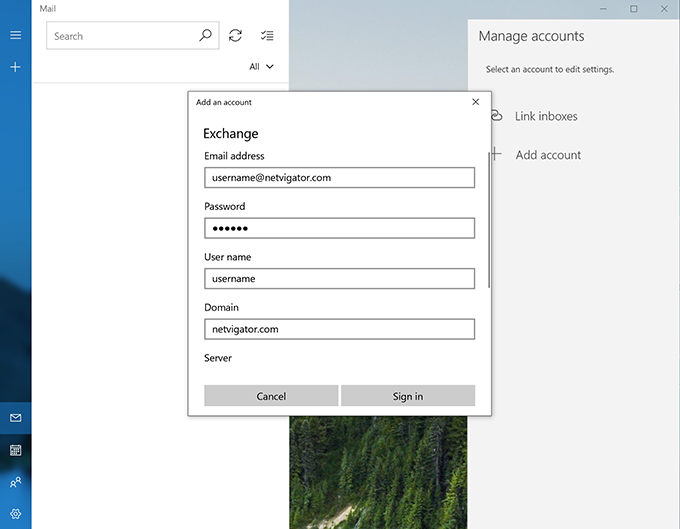
7. Enter the following details:
Email address: (your NETVIGATOR email address)
Password: (your NETVIGATOR password)
User name: (your NETVIGATOR Login ID, do NOT include "@netvigator.com") -
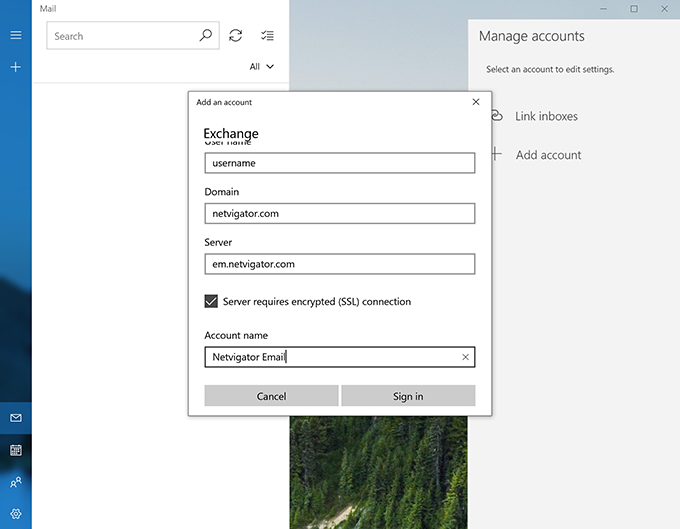
8. Enter the following details:
Domain: netvigator.com
Server: em.netvigator.com
Click "Sign in" -
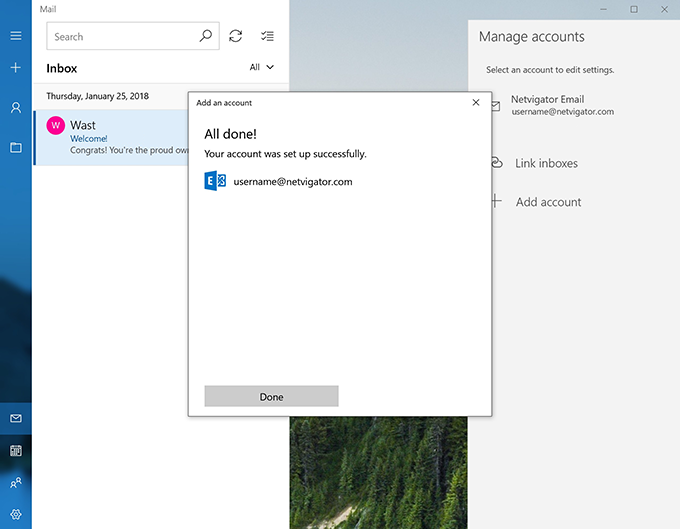
9. Click "Done" to finish setup
Your Windows OS can now receive push email
-
-
NETVIGATOR email IMAP setup for Mac OSX
-
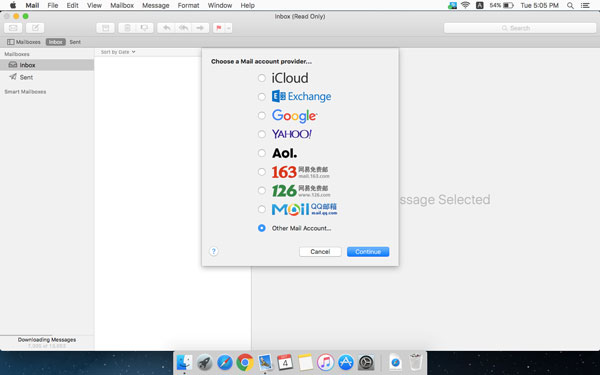
1. Open the mail app, select "Add Other Mail Account" and click "Continue"
-

2. Enter your NETVIGATOR email details, but with an incorrect password, then click "Create"
-
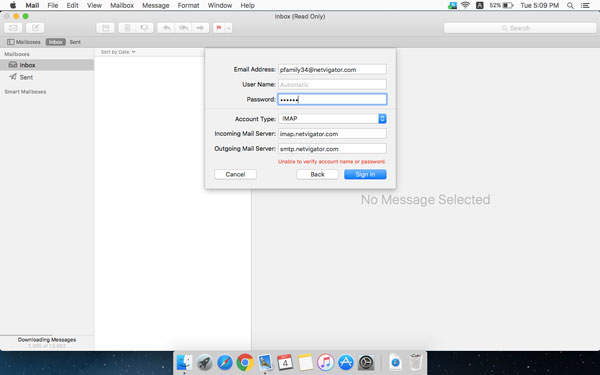
3. Enter your NETVIGATOR email address and the following details: Password: Your NETVIGATOR email password Account type: IMAP Server address: imap.netvigator.com Click "Sign in"
-

4. Click "Done"
-
5. You are now able to receive NETVIGATOR email
-
-
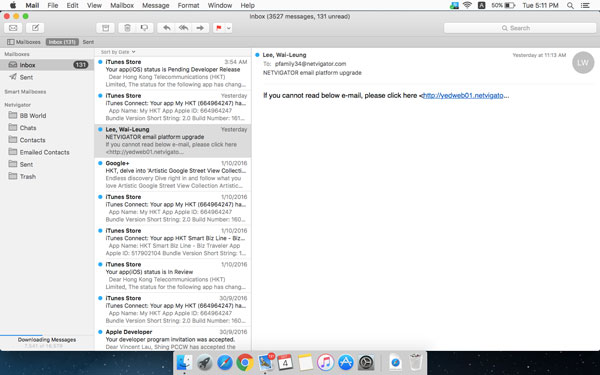
NETVIGATOR Email IMAP setup for Windows 10
-
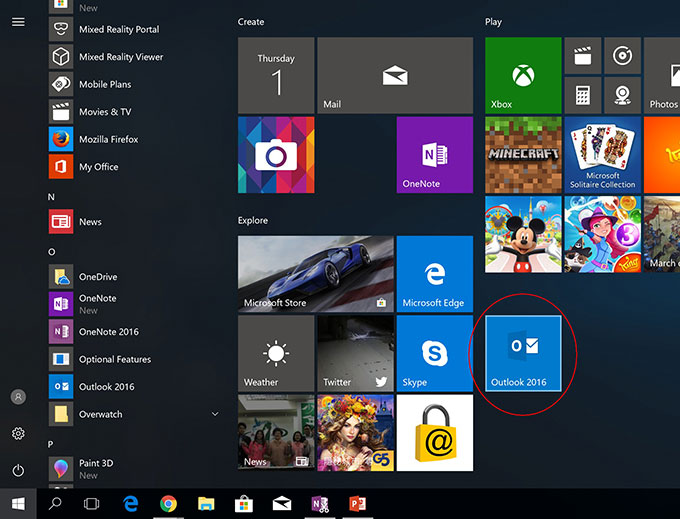
1. Click "Outlook 2016" on "Start" screen
-
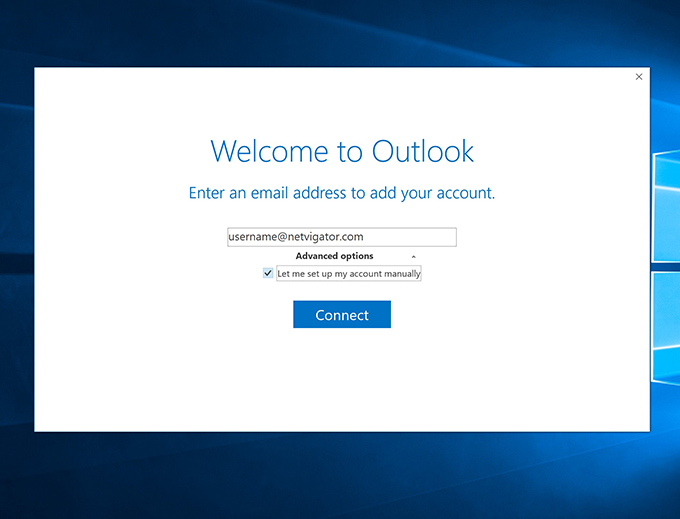
2. Enter your NETVIGATOR email address and click "Connect"
-

3. Select "IMAP"
-
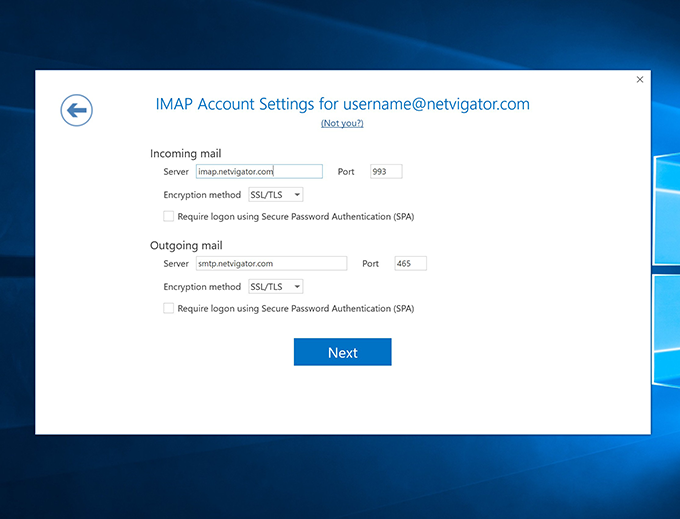
4. Enter the following details:
Incoming mail
Server: imap.netvigator.com
Port: 993
Encryption method: SSL/TLS
Outgoing mail
Server: smtp.netvigator.com
Port: 465
Encryption method: SSL/TLS
Click "Next" -
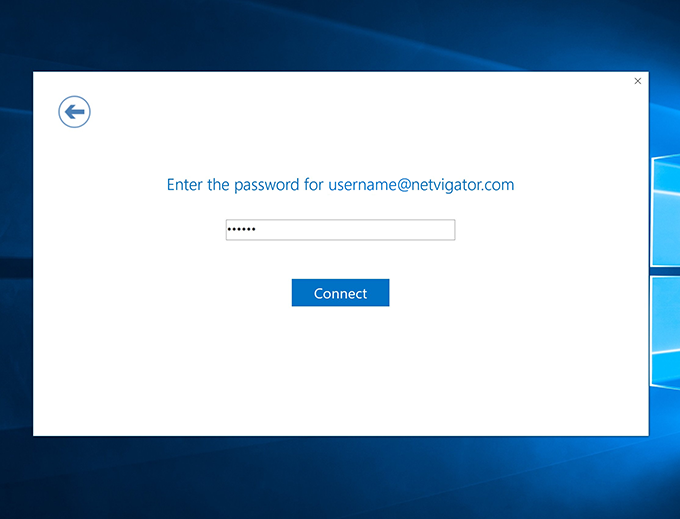
5. Enter your NETVIGATOR password and click "Connect"
-

6. Click "OK" to finish setup
Your Windows OS can now receive NETVIGATOR email
-
-
NETVIGATOR EMAIL FREQUENTLY-ASKED QUESTIONSGeneral FAQ
-
1. How do I change my password?
After logging into webmail, go to the upper right-hand corner and select "Change Password" in the drop-down menu.
Or go to https://cs.netvigator.com/eng/, then select "Change Password" in the left-hand column under "My Profile". -
2. What should I do if I forget my password?
Submit an inquiry by clicking "Forgot Password" at the NETVIGATOR Email login page, or at https://cs.netvigator.com/eng/. Or call Hotline 1000 for help.
-
3. What should I do if I forget my login?
Submit an inquiry by clicking "Forgot Login ID" at the NETVIGATOR email login page, or at https://cs.netvigator.com/eng/. Or call Hotline 1000 for help.
-
4. Can I still keep my email service/address if I terminate NETVIGATOR broadband service?
No. NETVIGATOR Email Service is available only to NETVIGATOR broadband customers.
-
5. Will my mailbox continue to receive email if my broadband line is suspended because of non-payment?
Your NETVIGATOR Email account may be suspended by us, which means you will be unable to send/receive messages.
-
6. How long will my stored email are kept after service termination? Can I get it back?
Your NETVIGATOR Email mailbox will cease to exist the instant your broadband service is terminated. Mailbox content cannot be retrieved after termination.
-
7. Can I keep stored email if my email address is changed?
No. Email in your old NETVIGATOR Email account cannot be moved to a new account.
-
8. Are any email content constraints in force – eg affecting those of a political or erotic nature?
No such specific constraints are in force in respect of your incoming/outgoing email. However, incoming email may be classified as spam and filtered to the junk folder if you have subscribed to MailGuard Plus, or if the Enhanced Junk Filter is switched on.
-
9. I want to send email to my friends, is there any restriction to what I can send?
We're glad you asked, because to cut down on "SPAMMING" and "JUNK MAIL", and possible "overflowing" of email boxes, NETVIGATOR, has put into place a few limits.
Function & Operations-
1. How much email storage capacity do I have?
Your NETVIGATOR email account comes with expandable storage capacity, so it increases according to use.
-
2. Is email storage capacity unlimited?
Storage capacity will expand according to use.
-
3. Is Disposable Email Address storage capacity unlimited?
No separate capacity exists for emails received by a Disposable Email Address. Your NETVIGATOR email account storage capacity applies.
-
4. What's the biggest email I can send?
You may send email, includes attachments, with full size ranging on or below 35 Megabytes.
-
5. Can I send/receive email when storage capacity is actually being expanded?
You should be able to send/receive email while mailbox storage is being expanded, because it is undertaken at the system's backend.
-
6. How many email filters can I create?
Normally, up to 100.
-
7. Is auto-reply/forward functionality available?
Yes. For auto-reply function, log into webmail then go to “Settings”. Select “Out of Office” to activate an auto-reply message and conditions.
For auto-forwarding function, log into webmail and go to “Settings”. Select “Accounts”, and tap to display all the sessions under your email account, then enter the appropriate destination email address in the field under “Access your mail elsewhere”. -
8. How many recipients can I send at most via NETVIGATOR SMTP?
To provide NETVIGATOR customers a safe internet environment, we have a non-disclose limit set policy for senders not sending high volume of emails via SMTP .
Technical Support-
1. What is the system requirement when using NETVIGATOR webmail?
Here are the basic browsers requirements for using NETVIGATOR webmail:
Windows: Chrome 96.0, Edge 95.0 or Firefox 95.0
Mac: Chrome 96.0, Edge 96.0, Firefox 95.0 or Safari 13.1.2
iOS: the latest version of Chrome, Edge, Firefox or Safari
Android: Chrome 96.0, Edge 96.0 or Firefox 95.2 -
2. Can I check email when using Windows 10 and Edge?
Yes. Simply login and access your NETVIGATOR email account using the "Open with Internet Explorer" feature of the Windows 10 Edge browser.
-
3. How do I recover a deleted email?
Deleted email messages are moved to trash, so you could recover by moving them back to the inbox or another folder. However, email cannot be recovered once deleted from trash.
-
4. Will NETVIGATOR back up my email data? Can you retrieve messages for customers?
In the interests of privacy, we do not back up email after it has been deleted. We are therefore unable to retrieve deleted email for customers.
-
5. Can I login to my email account using more than one device at the same time?
Yes. You can log into your NETVIGATOR email account simultaneously via multiple devices.
-
6. My friend sent me an email, but I can't find it in my inbox. What should I do?
If you have subscribed to MailGuard Plus, or if the Enhanced Junk Filter is switched on, incoming email could be classified as spam and filtered to the junk folder, so please check. Alternatively, email could be delivered to other folders, especially if you have a Disposable Email Address and/or mail filter in force.
-
7. My friend has sent email messages to me but I never receive them. What can I do?
To investigate the problem, we need the message delivery report which will usually return to the email sender if the message cannot reach the email recipient. The reason for the email return can be found on this report.
-
8. Where will an email go if a specified folder is deleted?
If you delete a whole folder, it and all email contained therein will be moved to trash.
-
9. My NETVIGATOR email account receives many spam/phishing emails.
Would NETVIGATOR remonstrate with email service providers subscribed to by the senders, in order to stop such activity?NETVIGATOR always contacts a spammer's service provider to inform them about such activity when spam/phishing cases are reported by our customers. In addition, we suggest customers should activate the Enhanced Junk Filter feature.
-
